
This article explains how to start and check the status of an Automation from a custom-built Salesforce Marketing Cloud form.
How is it useful?
As you know, the Automations can only be triggered by 2 events: based on a schedule or via a file drop.
Except, this statement is incorrect! We can also trigger Automations using code, with SSJS, SOAP and REST (even though the latter is not documented).
The most obvious advantage is to be able to start an Automation on demand, but there is also another reason why this can be very useful: Automation scripts don’t time out for 30 minutes when processing the data!
This means that if we want to, we can potentially perform a lookup for a hundred thousand records from a Cloud page form and never see it time out.
How it works
We are going to create a form that starts an Automation and checks every 10 seconds if the said Automation has finished running.
In order to do that, we first need to understand how to start and check the status of an Automation using server-side JavaScript.
Before we begin
Obviously, we need to create an Automation, populate it with at least one Activity and save it. Let’s call it My Test Automation.
Now, in order to proceed, we need to learn 2 SSJS techniques:
How to start an Automation
Before we can do anything, we need to fetch the ObjectID property of our Automation, by performing a search based on the name of the Automation.
var api = new Script.Util.WSProxy();
var automationName = "My Test Automation";
var cols = ["Name","ProgramID","CustomerKey","Status"];
var filter = {
	Property: "Name",
	SimpleOperator: "equals",
	Value: automationName
};
var result = api.retrieve("Automation", cols, filter);
var objectId = result.Results[0].ObjectID;
Then, all we need to do, is to use the ObjectID property to trigger the performItem function with the word start as the action parameter.
var properties = {
	ObjectID: objectId
};
var action = "start";
var options = {};
var result = api.performItem("Automation", properties, action, options);
How to check for the status of an Automation
Checking the status after the Automation has started running is as easy as looking up the ObjectID:
var cols = ["Name","ProgramID","CustomerKey","Status"];
var filter = {
	Property: "Name",
	SimpleOperator: "equals",
	Value: automationName
};
var result = api.retrieve("Automation", cols, filter);
var status = result.Results[0].Status;
The status of the Automation is returned as a number. Its meaning can be translated thanks to the following function:
function getAutomationStatusName(num) {

	switch(num) {
		case -1:
			status = 'Error';
			break;
		case 0:
			status = 'Building error';
			break;
		case 1:
			status = 'Building';
			break;
		case 2:
			status = 'Ready';
			break;
		case 3:
			status = 'Running';
			break;
		case 4:
			status = 'Paused';
			break;
		case 5:
			status = 'Stopped';
			break;
		case 6:
			status = 'Scheduled';
			break;
		case 7:
			status = 'Awaiting trigger';
			break;
		case 8:
			status = 'Inactive trigger';
			break;
	}

	return status;

}
Building the form
For this example, we are going to build a form with Bootstrap, Axios and Vue libraries. Bootstrap is used for styling, Axios for performing AJAX requests and Vue for making the form respond dynamically.
There are 3 parts to this application:
- Cloud page that contains the HTML form.
- Script that contains the Vue.js object and functions.
- Form Handler Cloud page that processes the data sent from the form via AJAX requests.
The form page and the Form Handler page are regular Cloud pages, created with the Content Builder option enabled. As for the script, feel free to store it within the form page or as a separate ressource page.
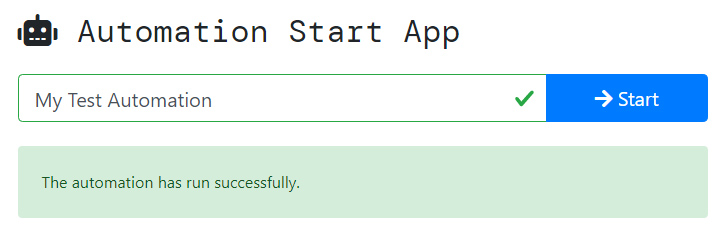
Form page
This is a typical HTML page for simple form applications built with Vue.js.
Notice how the submit button triggers the validateForm function and becomes disabled depending on the status variable.
This same variable controls the display of the spinner, as well as the success/error messages below the form. More on that later…
<!DOCTYPE html>
<html lang="en">
<head>
    <meta name="viewport" content="width=device-width, height=device-height, initial-scale=1.0, minimum-scale=1.0, maximum-scale=1.0, user-scalable=no, shrink-to-fit=no">
    <title>Automation Start App</title>
    <script src="https://cdn.jsdelivr.net/npm/axios/dist/axios.min.js"></script>
    <script src="https://cdn.jsdelivr.net/npm/vue/dist/vue.js"></script>
    <link rel="stylesheet" href="https://stackpath.bootstrapcdn.com/bootstrap/4.3.1/css/bootstrap.min.css" integrity="sha384-ggOyR0iXCbMQv3Xipma34MD+dH/1fQ784/j6cY/iJTQUOhcWr7x9JvoRxT2MZw1T" crossorigin="anonymous">
    <script src="https://kit.fontawesome.com/680fcb47ef.js" crossorigin="anonymous"></script>
    <link href="https://fonts.googleapis.com/css2?family=DM+Mono&display=swap" rel="stylesheet">
</head>
<body>
<div id="app" class="container">
    <div class="mx-auto my-5">
        <template>
            <h2 style="font-family: 'DM Mono', monospace;">
                <i class="fas fa-robot"></i> Automation Start App
            </h2>
            <form class="needs-validation my-4" ref="form" action="{{ FORM HANDLER URL }}" method="post">
                <div class="input-group input-group-lg">
                    <input
                        class="form-control"
                        v-model="form.name"
                        type="text"
                        minlength="3"
                        maxlength="254"
                        placeholder="Name..."
                        required
                    >
                    <div class="input-group-append">
                        <button
                            @click.prevent="validateForm()"
                            type="button"
                            class="btn btn-primary px-5"
                            :disabled="(status == 101 || status == 201 || status == 202)"
                        >
                            <i class="fas fa-arrow-right"></i> Start
                        </button>
                    </div>
                </div>
            </form>
        </template>
        <template v-if="status == 101">
            <div class="text-center text-primary">
                <div class="spinner-border" role="status">
                    <span class="sr-only"></span>
                </div>
            </div>
        </template>
        <template v-if="status == 201 || status == 102">
            <div class="row">
                <div class="col-12">
                    <div class="alert-info p-4 rounded">
                        <span class="spinner-border spinner-border-sm" role="status" aria-hidden="true"></span>
                        <span v-html="message"></span>
                    </div>
                </div>
            </div>
        </template>
        <template v-if="status == 200 || status == 500 || status == 404 || status == 400">
            <div class="row">
                <div class="col-12">
                    <div class="p-4 rounded" :class="(status == 200) ? 'alert-success' : 'alert-danger'">
                        <span v-html="message"></span>
                    </div>
                </div>
            </div>
        </template>
    </div>
</div>
<script src="{{ APP JS URL }}"></script>
</body>
</html>
Please, don’t forget to replace {{ FORM HANDLER URL }} and {{ APP JS URL }} with the URLs that you have created.
App.js
The application is managed by 3 main functions:
- validateForm verifies the validity of the form and triggers the sendFormData function when the form is valid.
- sendFormData switches the status variable to 101, sends an AJAX request to the Form Handler and, once the response is received, updates the application data (status and message variables) and triggers the checkStatus function.
- checkStatus sends the data in an AJAX request every 10 seconds until the returned Status from the Form Handler is equal to 200 or 500.
Note that the data that’s being sent by the sendFormData and checkStatus functions to the Form Handler has a different value for the form.context variable (equal to perform or check).
This variable is required for the Form Handler to define the course of action: start the Automation or check the status.
The form.context variable switches to perform or check values according to the Status returned by the Form Handler.
new Vue({
    el: '#app',
    data: {
        status: 100,
        form: {
            name: 'My Test Automation',
            context: 'perform'
        },
        endpoint: '',
        message: ''
    },
    watch: {
        status: function () {
            if(this.status == 201 || this.status == 102) {
                this.form.context = 'check';
            } else {
                this.form.context = 'perform';
            }
        }
    },
    mounted: function() {
        this.endpoint = this.$refs.form.getAttribute('action');
    },
    methods: {
        sendFormData: function() {
            this.status = 101;
            var $this = this;
            axios({
                method: 'POST',
                url: $this.endpoint,
                data: $this.form,
                validateStatus: function() { return true }
            }).then(function(result) {
                $this.status = result.data.Status;
                $this.message = result.data.Message;
                $this.checkStatus();
            }).catch(function(error) {
                console.error(error);
            });
        },
        checkStatus: function() {

            var $this = this;
            var intervalID = setInterval(function() {
				axios({
					method: 'POST',
					url: $this.endpoint,
					data: $this.form,
					validateStatus: function() { return true }
				}).then(function(result) {
					$this.status = result.data.Status;
					$this.message = result.data.Message;
					if($this.status == 200 || $this.status == 500) {
						clearInterval(intervalID);
					}
				}).catch(function(error) {
					console.error(error);
				});
            }, 10000);

        },
        validateForm: function() {
            if (this.$refs.form.checkValidity() !== false) {
                this.sendFormData();
            }
            this.$refs.form.classList.add('was-validated');
        }

    }
})
Form Handler page
This page implements the 2 methods we have seen previously: start the Automation or check the status.
It first retrieves the Automation parameters from a WSProxy request, then, according to the context (perform or check), it uses the ObjectID or the Status value to perform the necessary actions.
The result of these actions will be printed as an object with 2 keys: Status and Message.
The Status key will communicate to the form what was the result of the performed actions and has these possible values:
- 201: the Automation has started running.
- 102: the Automation is currently running.
- 200: the Automation is in status Ready, which means that it has finished running.
- 500: an error occurred.
<script runat='server'>
    Platform.Load('Core', '1');

    var api = new Script.Util.WSProxy();
    var postData = Platform.Request.GetPostData();
    var form = Platform.Function.ParseJSON(postData);

    try {

        var result = api.retrieve("Automation", ["Name","ProgramID","CustomerKey","Status"], {
            Property: "Name",
            SimpleOperator: "equals",
            Value: form.name
        });

        var automation = result.Results[0];

        var objectId = automation.ObjectID;

        if(objectId == null) throw "No automation with the name \"" + form.name + "\" was found.";

		if(form.context == "perform") {

            var props = {
                ObjectID: objectId
            };

            var action = "start";
            var opts = {};
            var result = api.performItem("Automation", props, action, opts);

            if(result.Status != "OK") throw compileMessage(result);

            var response = {
                Status: 201,
                Message: "The automation has started running."
            }

            Write(Stringify(response));

        }

        if(form.context == "check") {

            var status = getAutomationStatusName(automation.Status);

            if(status == "Running") {
                var response = {
                    Status: 102,
                    Message: "The automation is still running. Please wait, this might take some time."
                }
            } else if(status == "Ready") {
                var response = {
                    Status: 200,
                    Message: "The automation has run successfully."
                }
            } else {
                throw "Something went wrong. Automation status: " + status.toLowerCase() + ".";
            }

            Write(Stringify(response));

        }

    } catch(err) {

        var error = {
            Status: 500,
            Message: err
        }

        Write(Stringify(error));

    }

    function compileMessage(result) {

        if(result.StatusMessage.length > 0) {
            return result.StatusMessage;
        }
        else if(result.Results.length > 0 && result.Results[0].StatusMessage.length > 0) {
            return result.Results[0].StatusMessage;
        }
        else {
            return result;
        }

    }

    function getAutomationStatusName(num) {

        switch(num) {
            case -1:
                status = 'Error';
            break;
            case 0:
                status = 'Building error';
            break;
            case 1:
                status = 'Building';
            break;
            case 2:
                status = 'Ready';
            break;
            case 3:
                status = 'Running';
            break;
            case 4:
                status = 'Paused';
            break;
            case 5:
                status = 'Stopped';
            break;
            case 6:
                status = 'Scheduled';
            break;
            case 7:
                status = 'Awaiting trigger';
            break;
            case 8:
                status = 'Inactive trigger';
            break;
        }

        return status;

    }

</script>
Considerations
Although, starting an Automation is pretty easy, there is no simple way to send the data from the form to the Automation Activities.
The best way to achieve this is to write the data in a Data Extension that the Automation Activity is configured to fetch the data from and empty the data of the Data Extension after the Automation has finished running.

Have I missed anything?
Please poke me with a sharp comment below or use the contact form.
Hi, really useful information. I am thinking to use this to solve one of the use-cases. I understand that there is a form, app.js & form-handler. But what I don’t get is the flow. Please could you help me with it? For example, if user clicks on “start” button what happens next? does it go to app.js or form-handler.js, how these 3 codes, work together ? Thank you
Hi Natalia, let me explain 🙂 The HTML page and app.js are rendered in the browser, that’s what we call a front-end. The form handler is rendered on the server, that’s what we call a back-end. Basically, we gather all the data through the form in the customer’s browser and send it to the Marketing Cloud server, which writes the data in its datababase. App.js is written in plain JavaScript, which is the native programming language of the browser. Form handler, on the other hand, is written in server-side JavaScript or/and AMPscript. Server-side JavaScript (or SSJS) is a server language created by Salesforce for Marketing Cloud, it uses the same syntax as JavaScript and has some core similarities, but the comparison ends there. It’s basically a half-baked JavaScript from the year 2000.
Hi, Can I know if it’s possible to start the automation from the specific step rather than restarting from step1. Use-Case is that if there is a query on step 2 which failed and I want to start the automation beginning step2 rather than step1. Thanks!
Hi! Apparently you can but by using an undocumented endpoint. Haven tried it yet, but look at the comments to this question: https://salesforce.stackexchange.com/questions/371749/can-i-trigger-a-specific-step-of-automation-i-want-to-start-using-ssjs