This article explains how to successfully implement Google reCAPTCHA v3 (score-based) on Salesforce Marketing Cloud forms.
Why do we need reCAPTCHA?
Marketing Cloud forms, as any other web forms, can be copied and moved to another domain, where an automated script would submit the form on a fixed schedule, thus creating a huge number of fake records in Marketing Cloud for spamming or hacking purposes.
Google reCAPTCHA prevents this kind of operation and provides an additional layer of security against malicious form submissions.
v2 vs v3
In my previous article, I explained how to implement reCAPTCHA v2 on Marketing Cloud forms, but what would be the advantage of implementing v3?
Although visually v3 doesn’t look any different from v2 (invisible), it offers a new functionality that can be used to create a more advanced processes for SPAM filtering and provide a more seamless experience for the user.
Forget the pop-up with pictures and the endless struggle to find the traffic lights, mountains and boats.
Instead, reCAPTCHA v3 will run seamlessly and return a score from 0.0 to 1.0. The lower the score is, the most likely it is that the form was submitted by an automated process instead of a human being.
Based on this logic, we now have the possibility to manage the suspicious form submissions, instead of instantly rejecting them. For example, we can send the submitted data for moderation or add the email address provided by the submission to a blacklist.
How will it work?
In order to successfully implement reCAPTCHA v3 in Marketing Cloud, we first need to create a custom flow using the Form Handler technique.
In this flow, the page with the form will submit the data to the Form Handler page, which will process the data.
Before we start
As obvious as it seems, in order to start implementing Google reCAPTCHA, we need to create a Google account.
Once you have it, please proceed to the official reCAPTCHA page and register a new website.
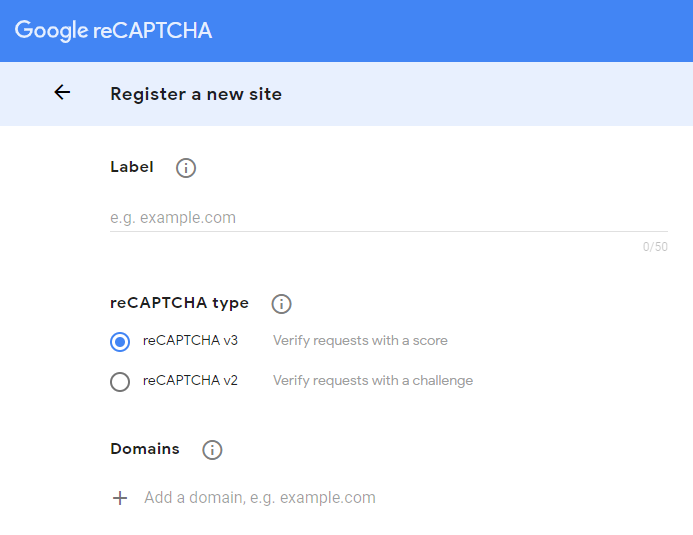
Add your Marketing Cloud domain in the domain list and choose reCAPTCHA v3 as the reCAPTCHA type.
After the registration is complete, you will be presented with 2 access keys:
site key and secret key.
Please copy these keys and paste them later in the code, whenever you come across these lines of code: {{ RECAPTCHA SITE KEY }} and {{ RECAPTCHA SECRET KEY }}
Implementation methods
There are 2 methods for the reCAPTCHA v3 implementation:
- Binding reCAPTCHA automatically to the submit button.
- Invoking reCAPTCHA manually.
Automatic binding method
This method is very simple. All we need is to call the reCAPTCHA script in the head tag and add some custom attributes to the submit button.
Form page
When it comes to setting up a simple HTML5 form validation with some basic styles, Bootstrap is the way to go.
<!DOCTYPE html>
<html lang="en">
<head>
    <meta charset="UTF-8">
    <meta name="viewport" content="width=device-width, initial-scale=1.0">
    <link
        rel="stylesheet"
        href="https://stackpath.bootstrapcdn.com/bootstrap/4.3.1/css/bootstrap.min.css"
        integrity="sha384-ggOyR0iXCbMQv3Xipma34MD+dH/1fQ784/j6cY/iJTQUOhcWr7x9JvoRxT2MZw1T"
        crossorigin="anonymous"
    >
    <script src="https://www.google.com/recaptcha/api.js?hl=en"></script>
</head>
<body>
    <div class="container">
        <div class="mx-auto my-5">
                <form id="form" class="needs-validation my-4" action="{{ URL TO FORM HANDLER }}"
                    method="post">
                    <div class="input-group input-group-lg">
                        <input
                            class="form-control"
                            type="email"
                            minlength="3"
                            maxlength="254"
                            placeholder="Enter your email..."
                            pattern="^([a-zA-Z0-9_\-\.]+)@([a-zA-Z0-9_\-\.]+)\.([a-zA-Z]{2,})$"
                            required
                        >
                        <div class="invalid-feedback order-last">
                            Please enter a valid email address.
                        </div>
                        <div class="input-group-append">
                            <button
                                class="g-recaptcha btn btn-primary"
                                data-sitekey="{{ RECAPTCHA SITE KEY }}"
                                data-callback='onSubmit'
                                data-action='submit'
                            >Send</button>
                        </div>
                    </div>
                </form>
        </div>
    </div>
    <script>
        var form = document.getElementById('form');
        function onSubmit() {
            if(form.checkValidity()) form.submit();
            form.classList.add('was-validated');
        }
    </script>
</body>
</html>
When the user clicks on the submit button, reCAPTCHA generates a token and puts it in an invisible form field named g-recaptcha-response.
Then, it executes a function, referenced in the data-callback attribute of the submit button.
In the example below, data-callback attribute calls the onSubmit function, that verifies the validity of the form and submits the form if all the fields are valid.
Form Handler page
The Form Handler page in this example has only one purpose: verify the validity of the reCAPTCHA token sent by the form page.
This is what we call server-side validation.
<script runat='server'>
    Platform.Load('core', '1');
    try {

        var g_recaptcha_response = Request.GetFormField("g-recaptcha-response");
        var secret = "{{ RECAPTCHA SECRET KEY }}";
        var payload = "secret=" + secret + "&response=" + g_recaptcha_response;
        var req = HTTP.Post('https://www.google.com/recaptcha/api/siteverify', 'application/x-www-form-urlencoded', payload);

        if (req.StatusCode == 200) {
            var resp = Platform.Function.ParseJSON(String(req.Response));
			if(!resp.success) throw "reCAPTCHA request returned an error";
        	if(resp.score < 0.5) throw "reCAPTCHA score is low, probably a SPAM";
        } else {
            throw "reCAPTCHA API error";
        }

        Write(Stringify(resp));

    } catch (error) {
        Write(Stringify({ status: "Error", message: error }));
    }
</script>
Invoking reCAPTCHA manually (POST method)
The invoking method is rather complicated but it allows for a more custom approach regarding the JavaScript code.
Form
In order to make it work, every step of the process needs to be triggered manually in the JavaScript:
- Add event listener for the form submission.
- Execute reCAPTCHA when ready.
- Once executed, add the token to the g-recaptcha-response field.
- Submit the form if all the fields are valid.
<!DOCTYPE html>
<html lang="en">
<head>
    <meta charset="UTF-8">
    <meta name="viewport" content="width=device-width, initial-scale=1.0">
    <link
        rel="stylesheet"
        href="https://stackpath.bootstrapcdn.com/bootstrap/4.3.1/css/bootstrap.min.css"
        integrity="sha384-ggOyR0iXCbMQv3Xipma34MD+dH/1fQ784/j6cY/iJTQUOhcWr7x9JvoRxT2MZw1T"
        crossorigin="anonymous"
    >
    <script src="https://www.google.com/recaptcha/api.js?render={{ RECAPTCHA SITE KEY }}&hl=en"></script>
</head>
<body>
    <div class="container">
        <div class="mx-auto my-5">
            <form
				id="form"
				class="needs-validation my-4"
                action="{{ URL TO FORM HANDLER }}"
				method="post"
			>
                <div class="input-group input-group-lg">
                    <input
						class="form-control"
						type="email"
						minlength="3"
						maxlength="254"
                        placeholder="Enter your email..."
						pattern="^([a-zA-Z0-9_\-\.]+)@([a-zA-Z0-9_\-\.]+)\.([a-zA-Z]{2,})$"
						required
					>
                    <div class="invalid-feedback order-last">
                        Please enter a valid email address.
                    </div>
                    <div class="input-group-append">
                        <button id="send" class="btn btn-primary">Send</button>
                    </div>
                </div>
                <input type="hidden" id="g-recaptcha-response" name="g-recaptcha-response">
            </form>
        </div>
    </div>
    <script>
        var form = document.getElementById('form');
        var recaptcha = document.getElementById('g-recaptcha-response')

        form.addEventListener('invalid', function (e) {
            e.preventDefault();
            this.classList.add('was-validated');
        }, true);

        form.addEventListener('submit', function (e) {
            e.preventDefault();
            grecaptcha.ready(function () {
                grecaptcha.execute(
                    '{{ RECAPTCHA SITE KEY }}',
                    { action: 'submit' }
                ).then(function (token) {
                    recaptcha.value = token;
                    form.submit();
                });
            });
        }, true);
    </script>
</body>
</html>
Form Handler page
The Form Handler code doesn’t change, but let’s try to use AMPscript this time to make it interesting.
%%[

    SET @Recaptcha = RequestParameter('g-recaptcha-response')
    SET @RecaptchaSecret = "{{ RECAPTCHA SECRET KEY }}"
    SET @RecaptchaURL = "https://www.google.com/recaptcha/api/siteverify"
    SET @RecaptchaPayload = CONCAT("secret=",@RecaptchaSecret,"&response=",@Recaptcha)

    SET @RecaptchaRequest = HTTPPost(@RecaptchaURL,"application/x-www-form-urlencoded", @RecaptchaPayload, @RecaptchaResponse)

    SET @SuccessRegEx = '"success": (true)'
    SET @RecaptchaSuccess = RegExMatch(@RecaptchaResponse, @SuccessRegEx, 1)

    SET @ScoreRegEx = '"score": ([-+]?\d*\.?\d*)'
    SET @RecaptchaScore = RegExMatch(@RecaptchaResponse, @ScoreRegEx, 1)

    IF EMPTY(@RecaptchaSuccess) THEN
        OUTPUTLINE(CONCAT("reCAPTCHA request returned an error"))
    ENDIF

    IF NOT EMPTY(@RecaptchaScore) AND ADD(@RecaptchaScore,0) < 0.5 THEN
        OUTPUTLINE(CONCAT("reCAPTCHA score is low, probably a SPAM"))
    ENDIF

]%%

%%=v(@RecaptchaResponse)=%%
Invoking reCAPTCHA manually (AJAX method)
This method showcases how to send the data from the form using AJAX.
Form page
All the different steps of method #1 remain the same, except for the last one.
Instead of submitting the form, 2 processes will be triggered:
- Collect the field values along with the reCAPTCHA token in a JSON object.
- Send the JSON object to the Form Handler using AJAX (Fetch in this case).
To make it simple, the response sent back from the Form Handler will be simply displayed with an alert window.
<!DOCTYPE html>
<html lang="en">
<head>
    <meta charset="UTF-8">
    <meta name="viewport" content="width=device-width, initial-scale=1.0">
    <link
        rel="stylesheet"
        href="https://stackpath.bootstrapcdn.com/bootstrap/4.3.1/css/bootstrap.min.css"
        integrity="sha384-ggOyR0iXCbMQv3Xipma34MD+dH/1fQ784/j6cY/iJTQUOhcWr7x9JvoRxT2MZw1T"
        crossorigin="anonymous"
    >
    <script src="https://www.google.com/recaptcha/api.js?render={{ RECAPTCHA SITE KEY }}&hl=en"></script>
</head>
<body>
    <div class="container">
        <div class="mx-auto my-5">
            <form
                id="form"
                class="needs-validation my-4"
                action="{{ URL TO FORM HANDLER }}"
                method="post"
            >
                <div class="input-group input-group-lg">
                    <input
                        class="form-control"
                        type="email"
                        name="email"
                        minlength="3"
                        maxlength="254"
                        placeholder="Enter your email..."
                        pattern="^([a-zA-Z0-9_\-\.]+)@([a-zA-Z0-9_\-\.]+)\.([a-zA-Z]{2,})$"
                        required
                    >
                    <div class="invalid-feedback order-last">
                        Please enter a valid email address.
                    </div>
                    <div class="input-group-append">
                        <button id="send" class="btn btn-primary">Send</button>
                    </div>
                </div>
            </form>
        </div>
    </div>
    <script>
        var form = document.getElementById('form');
        var recaptcha = document.getElementById('g-recaptcha-response')

        form.addEventListener('invalid', function (e) {
            e.preventDefault();
            this.classList.add('was-validated');
        }, true);

        form.addEventListener('submit', function (e) {
            e.preventDefault();
            grecaptcha.ready(function () {
                grecaptcha.execute(
                    '{{ RECAPTCHA SITE KEY }}',
                    { action: 'submit' }
                ).then(function (token) {
                    sendFormData(token);
                });
            });
        }, true);

        function sendFormData(token) {
            var data = formToJSON(form, token);
            fetch(form.action, {
                method: "POST",
                body: JSON.stringify(data)
            })
            .then(function (res) { return res.json(); })
            .then(function (data) { alert(JSON.stringify(data)) })
        }

        function formToJSON(form, token) {
            var data = {};
            for (var i = 0, ii = form.length; i < ii; ++i) {
                var input = form[i];
                if (input.name) {
                    data[input.name] = input.value;
                }
            }
            data["g-recaptcha-response"] = token;
            return data;
        }
    </script>
</body>
</html>
Form Handler page
As the Form Handler now needs to process a JSON object instead of a POST request, the script needs to be modified accordingly.
<script runat='server'>
    Platform.Load('core', '1');
    try {

        var postData = Platform.Request.GetPostData();
        var parsedData = Platform.Function.ParseJSON(postData);
        var g_recaptcha_response = parsedData["g-recaptcha-response"];
        var secret = "{{ RECAPTCHA SECRET KEY }}";
        var payload = "secret=" + secret + "&response=" + g_recaptcha_response;

        var req = HTTP.Post('https://www.google.com/recaptcha/api/siteverify', 'application/x-www-form-urlencoded', payload);

        if (req.StatusCode == 200) {
            var resp = Platform.Function.ParseJSON(String(req.Response));
 			if(!resp.success) throw "reCAPTCHA request returned an error";
        	if(resp.score < 0.5) throw "reCAPTCHA score is low";
        } else {
            throw "reCAPTCHA API error";
        }

        Write(Stringify(resp));

    } catch (error) {
        Write(Stringify({ status: "Error", message: error }));
    }
</script>
Conclusion
Google reCAPTCHA is very effective against automated attacks and I recommend using it on all the forms.
Only one question remains: which version should you choose?
- v2 is easier to implement but the user will be asked to prove he/she’s not a robot from time to time.
- v3 is harder to manage but it allows for a seamless user experience and a more custom approach regarding malicious form submissions.
Up to you to decide which version suits you best.

Have I missed anything?
Please poke me with a sharp comment below or use the contact form.

I was Invoking reCAPTCHA manually (AJAX method). I get the error in the console:
“Uncaught (in promise) SyntaxError: Unexpected token < in JSON at position 2 VM1025:2"
In dev tools in chrome, after clicking on VM1025:2 it shows the sources with the correct response in it. It never makes it to the alert,
.then(function (data) { alert(JSON.stringify(data)) })
{“success”:true,”challenge_ts”:”2021-07-08T23:32:22Z”,”hostname”:”cloud.sf.mysite.org”,”score”:0.9,”action”:”submit”}
Hi Ryan, I just verified myself the full code and it works perfectly for me without any issues.
I am trying to get Method 1 to work but I cannot verify that it is working whats the best way to see the response information ?
Sure, change
throw "reCAPTCHA API error"tothrow reqI couldn’t for some reason see any of the throws in the console but I did get method 2 to work you might want to fix your javascript though your javascript does not prevent the form from submitting if the fields are empty I took bootstrap 5’s validator and modified it a bit and it works great and you dont need to specify a form id.
// Example starter JavaScript for disabling form submissions if there are invalid fields
(function() {
‘use strict’;
window.addEventListener(‘load’, function() {
// Fetch all the forms we want to apply custom Bootstrap validation styles to
var forms = document.getElementsByClassName(‘needs-validation’);
var recaptcha = document.getElementById(‘g-recaptcha-response’)
// Loop over them and prevent submission
var validation = Array.prototype.filter.call(forms, function(form) {
form.addEventListener(‘submit’, function(event) {
if (form.checkValidity() === false) {
event.preventDefault();
event.stopPropagation();
}
grecaptcha.execute(
‘6LchNPMcAAAAAL2xs5UfoxuwqU6MGHzCek1RKci4’,
{ action: ‘submit’ }
).then(function (token) {
recaptcha.value = token;
});
form.classList.add(‘was-validated’);
}, false);
});
}, false);
})();
Hi Ivan!
Thank you very much for your article!
I’m trying to use the Automatic binding method but it doesn’t work for me. When I implement the code and run it, I get “reCAPTCHA request returned an error”. I use your advice with “req” and I get this:
“{“status”:”Error”,”message”:{“StatusCode”:200,”Response”:[“{\n \”success\”: false,\n \”error-codes\”: [\n \”invalid-input-response\”\n ]\n}”],”jintException”:”Jint.Native.JsException: Exception of type ‘Jint.Native.JsException’ was thrown.\r\n at Jint.ExecutionVisitor.Visit(ThrowStatement statement)\r\n at Jint.Expressions.ThrowStatement.Accept(IJintVisitor visitor)\r\n at Jint.ExecutionVisitor.Visit(IfStatement statement)\r\n at Jint.Expressions.IfStatement.Accept(IJintVisitor visitor)\r\n at Jint.ExecutionVisitor.Visit(BlockStatement statement)\r\n at Jint.Expressions.BlockStatement.Accept(IJintVisitor visitor)\r\n at Jint.ExecutionVisitor.Visit(IfStatement statement)\r\n at Jint.Expressions.IfStatement.Accept(IJintVisitor visitor)\r\n at Jint.ExecutionVisitor.Visit(BlockStatement statement)\r\n at Jint.Expressions.BlockStatement.Accept(IJintVisitor visitor)\r\n at Jint.ExecutionVisitor.Visit(TryStatement statement)”}} ”
I don’t know where may be the problem. Also, I used your guide for v2 reCAPITCHA and it drops the error “Wrong reCAPTCHA” either I use AMPscript or SSJS.
I also tried to submit the form on other devices but it didn’t help.
Thank you very much for your help!
Thank you Peter and sorry, I thought you had a problem with SSJS, not JS. My code uses a native HTML5 validation. If you need a text field to be required and not empty, you need to add the attributes
minlength="2"andrequiredto the input tag, no extra code is needed.Kirill, do you copy/paste my code or did you modify it? Are your reCAPTCHA v3 credentials put in all the correct places and the domain is allowed?
Ivan do you think you can Update your code to work with bootstraps 5.2 validator form code ?
This is bootstraps js currently for validation.
// Example starter JavaScript for disabling form submissions if there are invalid fields
(function () {
‘use strict’
// Fetch all the forms we want to apply custom Bootstrap validation styles to
var forms = document.querySelectorAll(‘.needs-validation’)
// Loop over them and prevent submission
Array.prototype.slice.call(forms)
.forEach(function (form) {
form.addEventListener(‘submit’, function (event) {
if (!form.checkValidity()) {
event.preventDefault()
event.stopPropagation()
}
form.classList.add(‘was-validated’)
}, false)
})
})()
Hi,
Is there a way to use reCpatcha also in Smart Captcha forms in Markting Cloud pages?
not that I’m aware of 🙁 reCAPTCHA requires server-side validation that SFMC doesn’t provide out of the box.