
This article explains how to create a Data Extension with data retention options using server-side JavaScript in Salesforce Marketing Cloud.
Data retention what?
In a nutshell, Data Extensions are a Marketing Cloud way of visualising and managing database tables. But, on top of providing us with some basic editing functionalities, they also offer some interesting features, such as Data Retention options and access permissions.
What do these Data Retentions options do?
They define for how long the data will remain in the Data Extension, until being automatically and permanently deleted.
Creating a Data Extension
There are multiple ways of creating a Data Extension in server-side JavaScript, but in this example we are going to use the WSProxy method, as it provides more error information when included in the try…catch function.
For the purpose of being brief, let’s create a simple Data Extension with 3 fields (FirstName, LastName and EmailAddress) and place it in the root folder (CategoryID = 0).
<script runat="server">

    Platform.Load("core", "1");

    var api = new Script.Util.WSProxy();

    api.setClientId({
		"ID": Platform.Function.AuthenticatedMemberID()
	});

	try {

        var config = {
            "CustomerKey": String(Platform.Function.GUID()).toUpperCase(),
            "Name": "MyNewDataExtension",
            "CategoryID": 0,
            "Fields": [
                {
                    "Name": "FirstName",
                    "FieldType": "Text",
                    "MaxLength": 50
                },
                {
                    "Name": "LastName",
                    "FieldType": "Text",
                    "MaxLength": 80
                },
                {
                    "Name": "EmailAddress",
                    "FieldType": "EmailAddress",
                    "IsPrimaryKey": true,
                    "IsRequired" : true
                }
            ]
        };

        var result = api.createItem("DataExtension", config);

        Write(Stringify(result));

	} catch(error) {

        Write(Stringify(error));

    }

</script>
Note that on the top of the usual bit of code, we set the ClientId to the Id of the Business Unit in order to avoid any user permission errors when adding the retention options later on.
Retention options
Now that our code is ready, we’ll need to add the Data Retention options by providing some key/value pairs to the JavaScript object used bu the createItem function.
Here is the list of the available and their description from the official documentation.
| Name | DataType | Description |
|---|---|---|
| DataRetentionPeriod | String | Specifies the period during which the application retains the data within a data extension. Valid values include: Days, Weeks, Months, Years |
| DataRetentionPeriodLength | Number | Specifies the number of time units for which data is retained. |
| DeleteAtEndOfRetentionPeriod | Boolean | Indicates whether data is deleted at the end of the retention period. If the value is false, the application deletes the entire data extension. If the value is true, the application deletes the data within the data extension but retains the data extension itself. |
| ResetRetentionPeriodOnImport | Boolean | Indicates whether a data retention period is reset after a successful import of new data. A value of true indicates that the data retention period resets to the beginning upon completion of a successful data import. A value of false indicates that the data retention period continues from the original starting point. |
| RetainUntil | Date | Indicates the date that ends the retention period for a data extension. |
| RowBasedRetention | Boolean | Indicates whether the data retention policy removes data by row or deletes all data in an entire data extension. A value of true indicates that all records within a data extension are removed at the same time. A value of false indicates that the application can remove individual rows within a data extension. |
Nothing complicated so far, but let’s have a look at how these definitions are translated into a visual interface in Marketing Cloud.
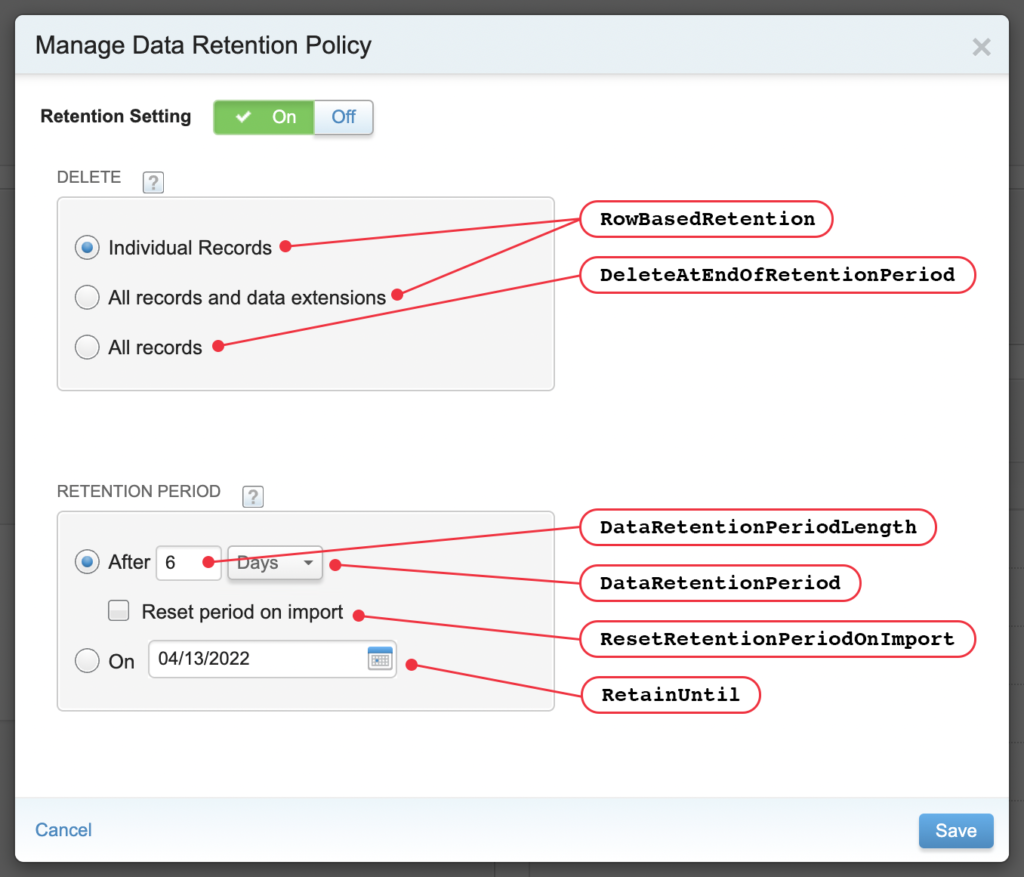
Note that RowBasedRetention is a boolean field that is associated to a different option based on value. When true, it sets the retention to apply to all records and Data Extensions. When false, it applies the individual records.
Finding the right combination
So far we have established, what Data Retention options are, where they are located on the user interface and what they mean.
Now, let’s see how add these options in our existing script.
There is just one small problem: providing all the options at once will inevitably result in error!
Therefore, we need to proceed by use case and make sure there are no conflicting options being provided:
Delete individual records after 6 days
/*
- DELETE: Individual records
- RETENTION PERIOD: After 6 days
*/
"DataRetentionPeriodLength": 6,
"DataRetentionPeriod": "Days",
"RowBasedRetention": true
Delete all records and data extensions after 4 weeks (reset on import)
/*
- DELETE: All records and data extensions
- RETENTION PERIOD: After 4 weeks, reset on import
*/
"DataRetentionPeriodLength": 4,
"DataRetentionPeriod": "Weeks",
"RowBasedRetention": false,
"ResetRetentionPeriodOnImport": true
Delete all records and data extensions on 5/10/2022
/*
- DELETE: All records and data extensions
- RETENTION PERIOD: On 05/10/2022
*/
"RowBasedRetention": false,
"RetainUntil": "5/10/2022 12:00:00 AM"
Delete all records on 5/10/2022
/*
- DELETE: All records
- RETENTION PERIOD: On 05/10/2022
*/
"RowBasedRetention": false,
"DeleteAtEndOfRetentionPeriod": true,
"RetainUntil": "5/10/2022 12:00:00 AM"
Full code
Here is an example of code with the Data Retention options added to the configuration object for the createItem function.
<script runat="server">

    Platform.Load("core", "1");

    var api = new Script.Util.WSProxy();

	api.setClientId({
		"ID": Platform.Function.AuthenticatedMemberID()
	});

    var config = {
        "CustomerKey": String(Platform.Function.GUID()).toUpperCase(),
        "Name": "MyNewDataExtension",
        "CategoryID": 0,
        "Fields": [
            {
                "Name": "FirstName",
                "FieldType": "Text",
                "MaxLength": 50
            },
            {
                "Name": "LastName",
                "FieldType": "Text",
                "MaxLength": 80
            },
            {
                "Name": "EmailAddress",
                "FieldType": "EmailAddress",
                "IsPrimaryKey": true,
                "IsRequired" : true
            }
        ],
		"DataRetentionPeriodLength": 4,
		"RowBasedRetention": false,
		"ResetRetentionPeriodOnImport": true,
		"DeleteAtEndOfRetentionPeriod": false,
		"DataRetentionPeriod": "Weeks"
    };

    var result = api.createItem("DataExtension", config);

    Write(Stringify(result));

</script>
Troubleshooting
There are 2 common errors that pop-up when a wrong set of keys is passed to the configuration object:
Enter a retention period or a retain until date. You cannot enter both.
The error is self-explanatory. To solve it, please make sure to remove the following keys from the configuration object:
DataRetentionPeriodLength,
DeleteAtEndOfRetentionPeriod,
DataRetentionPeriod,
ResetRetentionPeriodOnImport
The Data Extension Manage Data Retention user permission must be set in order to use the Data Extension Retention policies.
To solve this error, please add a WSProxy impersonation in the beginning of your code (after the WSProxy initialisation).
api.setClientId({
	"ID": Platform.Function.AuthenticatedMemberID()
});
Have I missed anything?
Please poke me with a sharp comment below or use the contact form.