This article explains how to successfully implement Google reCAPTCHA v2 (invisible) on Salesforce Marketing Cloud forms.
Why do it?
Because security is everything when it comes to processing customer’s data.
Google reCAPTCHA v2 (invisible) provides a seamless security layer against abusive form submissions and spam attacks.
You may notice that there is also a version 3 of reCAPTCHA. But for our use case, where a single form needs to be submitted by the customer, v2 is more than sufficient.
Before we start
As obvious as it seems, in order to start implementing Google reCAPTCHA, we need to create a Google account.
Once you have it, please proceed to the official reCAPTCHA page and register a new website.
Add your Marketing Cloud domain in the domain list and choose reCAPTCHA version 2 (invisible badge) as the reCAPTCHA type.
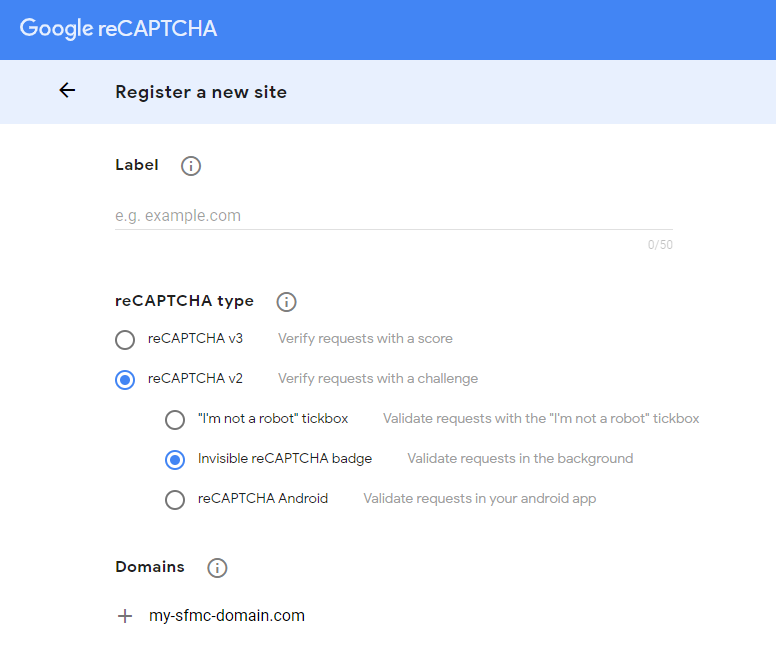
After the registration is complete, you will be presented with 2 access keys:
site key and secret key. Please make sure to take note them down for later use.
How does it work?
In order to successfully implement reCAPTCHA, we need to validate it twice: first on the front-end (the form page) and then the back-end (the form handler page).
Here is how the flow works:
- Customer clicks on the submit button, which triggers reCAPTCHA, instead of classical form submission.
- If the behaviour wasn’t suspicious, reCAPTCHA sends a request for a token key from Google servers, otherwise, a verification question is displayed and only if answered correctly reCAPTCHA sends for a token.
- Once the token key is received, the form submission can proceed and the token is sent along with other values to the Form Handler page.
- The Form Handler receives the token and sends another request to the Google servers to verify that the token was generated within the last couple of minutes coming from your domain.
- If successful, the Form Handler page can proceed, otherwise an error message is displayed or sent as a response.
Now, let’s have a look how to make it work using HTML and JavaScript.
Form page
The implementation is simple but requires some knowledge of HTML and plain JavaScript to be executed.
We first need to call the reCAPTCHA script in the header, then put a div tag somewhere in our form with a specific class and data attributes.
Please make sure to replace {{ YOUR SITE KEY }} in the code below with the site key you received on the reCAPTCHA website earlier, and {{ FORM HANDLER URL }} with your Marketing Cloud Form Handler page URL.
The JavaScript below will prevent the form to be submitted unless reCAPTCHA is a pass and the token is received from Google servers.
<!DOCTYPE html>
<html lang="en">
<head>
    <script src="https://www.google.com/recaptcha/api.js"></script>
</head>
<body>
    <form id="form" action="{{ FORM HANDLER URL }}" method="post">
        <label>Email: </label>
        <input type="email" name="EmailAddress">
        <div
            class="g-recaptcha"
            data-sitekey="{{ YOUR SITE KEY }}"
            data-callback="grecaptchaCallback"
            data-size="invisible"
        ></div>
        <br>
        <button>Send</button>
    </form>
    <script>
        var form = document.getElementById('form');

        form.addEventListener('submit', grecaptchaValidate);

        function grecaptchaCallback() {
            return new Promise(function (resolve, reject) {
                if (grecaptcha.getResponse() !== '') {
                    form.submit();
                }
                grecaptcha.reset();
            })
        }

        function grecaptchaValidate(e) {
            e.preventDefault();
            grecaptcha.execute();
        }
    </script>
</body>
</html>
Form Handler page
When it comes to the Form Handler, you have a choice of language: AMPscript or server-side JavaScript. One is not better than the other, but please make sure to account for the error handling with the method of your choice.
Please make sure to replace {{ YOUR SECRET KEY }} in the code below with the site key you received on the reCAPTCHA website earlier.
AMPscript solution
%%[

    SET @Token = RequestParameter("g-recaptcha-response")

    SET @Secret = "{{ YOUR SECRET KEY }}"
    SET @ContentType = "application/x-www-form-urlencoded"
    SET @Endpoint = "https://www.google.com/recaptcha/api/siteverify"
    SET @Payload = CONCAT("secret=", @Secret, "&response=", @Token)

    SET @Request = HTTPPost(@Endpoint, @ContentType, @Payload, @Response)

	IF @Request == 200 AND indexOf(@Response, '"success": true') > 0 THEN

		/// DO SOMETHING

	ELSE
		OUTPUTLINE(CONCAT("Wrong reCAPTCHA: ", @Response))
	ENDIF

]%%
Server-side JavaScript solution
<script runat="server">

    Platform.Load("core", "1.1.1");

    try {

        var g_recaptcha_response = Request.GetFormField("g-recaptcha-response");
        var secret = "{{ YOUR SECRET KEY }}";
        var payload = "secret=" + secret + "&response=" + g_recaptcha_response;
		var contentType = "application/x-www-form-urlencoded";
		var endpoint = "https://www.google.com/recaptcha/api/siteverify";
        var req = HTTP.Post(endpoint, contentType, payload);

        if (req.StatusCode == 200) {

            var resp = Platform.Function.ParseJSON(String(req.Response));

            if (!resp.success) throw "Wrong reCAPTCHA";

        } else {
            throw "reCAPTCHA API error";
        }

        /// DO SOMETHING

        Write(Stringify(resp));

    } catch (error) {
        Write(Stringify({ status: "Error", message: error }));
    }

</script>
Changing the language
In order to change the language, simply add a language code parameter in source attribute of the script tag.
<script src="https://www.google.com/recaptcha/api.js?hl={{ LANGUAGE CODE }}"></script>
<!-- Example: https://www.google.com/recaptcha/api.js?hl=en -->
Have I missed anything?
Please poke me with a sharp comment below or use the contact form.

Can we implement reCAPTCHA for Smart Capture form? If yes where should I add the div tag in the Smart Capture block.
Firstly thank for creating such useful blog especially to create a level of security using reCaptcha.
I was successfully able to implement to for my personal domain [sfmc-ninja.tech].
But what is the domain to be used for the cloudpage hosted on SFMC? In this step [https://i.imgur.com/S81cvB0.png]
I get the error as “ERROR for site owner:
Invalid domain for site key”
Please use the domain of your SFMC implementation 😉
The short answer is yes, but no 🙂 You can use it, but you will not have a server-side validation for your reCAPTCHA.
Hi,
I used this amazing guide to implement reCAPTCHA.
and I stuck in a problem that I couldn’t find any solution.
I post a question on Stack and I gave a lot of details about the problem.
https://stackoverflow.com/questions/63150950/post-custom-handler-url-recaptcha
I would be happy if someone could consider your opinion of the problem.
Thank a lot.
I replied 😉 Also, feel free to check this article, even though it uses Vue: https://ampscript.xyz/how-tos/how-to-use-vue-bootstrap-and-recaptcha-to-build-forms-for-salesforce-marketing-cloud/
This might be a ‘stupid’ question, but I’m kind of new to Marketing Cloud.
I have an issue with the ‘form handler page’. I’m using smart capture on a cloudpage and I want to add this recaptcha. All went good except for the ‘back-end’ part. I don’t know what to fill in in the ‘{{ FORM HANDLER URL }}’… Everything I try to find on Google about this sends me to Pardot, but I’m not using Pardot. (Maybe that is my problem)…
Any help would be much appreciated!
Great post, understandable for a newbie like me!
Hello there,
This method only works with custom forms, so basically not with Smart Capture.
Can we encrypt and decrypt the reCapcha keys? if yes then where to store it? and how to use it?
Sameer, reCaptcha keys don’t need to be encrypted, decrypted or stored. They are only valid for 2 minutes for 1 particular form submission.
I am trying this procedure but its not working. The error statement( status: “Error”, message: error ) is always there.
Start from scratch and follow all the steps. Replace whatever I put between
{{…}}.I was having some issues in client side so I changed it accordingly.
The server side code is working fine,thanks!
Also one thing , I am not getting the analytics at my google recaptcha by this verification procedure. Can you help me in this.
Have you waited 24hours since the implementation?
Hi Ivan Razine, thanks for your sharing us this post.
I have followed all the steps and used the the same code and after I tried to check the checkbox of REcaptcha I just got a success msg : {“success”:true,”challenge_ts”:”2022-03-15T17:00:26Z”,”hostname”:”mc6rkf51z4p8qkmjzdbshqznk518.pub.sfmc-content.com”} but it was still not worked .
Which method did you use? Which reCAPTCHA version? What did not work exactly? I can’t help you if you don’t explain your problem properly 😉
Thanks for the tutorial. I have combined this with your custom form tutorial and it works as expected.
I am currently trying to work out the best way to roll this out in multiple languages.
Well, when you call re-captcha script you pass the language parameter
?hl=en. Use https://developers.google.com/recaptcha/docs/language for language code reference.Thanks again. working perfectly 🙂
Stored the languages and translations in a data extension and using ampscript to lookup based on language code.